
Home : CNC :
 The last thing to do before machining is to drop the dust shoe down to the top of the workpiece, center it on the router collet/tool, and tighten the knob. Because the shoe is mounted to the Z carriage (instead of the router) its position is unaffected by Z moves.
The space between the bottom of the router and the top of the shoe needs to be at least as big as the depth of cut. Deep cuts with short tools could be a problem. Letting more of the tool show is fine so long as ~3/4" of the tool is inside the collet.
[ comment | link | top ]
 The bottom (please don't Spoil it) board has m5 threaded inserts every 64mm (X-Carve every 75). The holes along the engraved lines can accommodate 5mm dowels or m4 screws. 5mm dowels can be used to create a straightedge or square to insure that the project material will be parallel to the X and/or Y axes. The m4 inserts can be used for mounting pretty much anything, in this case they are used to mount (w/ 4 - m4 shoulder screws) the removable top (feel free to Spoil it) board. The 5.5mm holes in the top board align with the m5 inserts in the bottom board. The top board can be replaced with with any other board that protects the bottom board from through cuts.
[ comment | link | top ]
 The router and shop vac are plugged into an electrical box containing a solid state relay. The relay is triggered from the spindle on/off pin on the motion controller board. Any G-code spindle on/off command (M03/M05) will turn the router and shop vac on/off. All Estlcam projects will have/send those commands at the start/end of the program and for each tool change pause/resume. The emergency stop button, Esc key, and pause icon will also turn off the router and shop vac. The rotation icon (pictured) near the bottom left of the control window can be used to test functionality.
[ comment | link | top ]
 Touch probing is an easy way to set the cutting tool origin to the corner or center and/or top of the workpiece. Touch probing is basically a switch that sets an axis to zero based on when the grounded probe/tool (the double insulated Dewalt router needs a ground wire clipped to the tool) touches a piece of aluminum connected to the 5v probe port on the controller board (via the cable with a DC socket on the end). Accuracy depends on how accurate the entered dimensions for the probe/tool and aluminum are. There is a 6.35mm/1/4" drill rod probe (for straight bit X,Y 0), but spiral bits also work well as probes (depending on the bit, it may need to be rotated slightly to insure contact just behind the cutting edge).
The only Estlcam settings that may need to be changed are probe/tool diameter (edge/corner finding only) and aid thickness. This applies to all probe options, almost all of the other settings are for probing on machines without a probe port. The aid thickness is preset when using the 3-axis touch plate (5mm X and Y, 6mm Z), enter 6mm when using it (upside down) for manual Z probing. The .08mm (aid thickness) aluminum tape can be used for all manual probing.
Manual probing: Slowly jog (arrow keys only) the axis you want to zero until the probe touches the tape or plate and stops. Release the key and the tool/probe will back off 5mm. Be careful not to ground the red/5v alligator clip (or 3-axis touch plate) and remember to attach/remove the ground clip to/from the tool. After probing you can enter the XY command to move the router to the X,Y origin. The 3-axis plate can be used for finding the center of rectangular material using the 4 or 6 point probe options (round center is tape only).
Automatic corner probing (12sec video): Place the 3-axis touch plate on the front left corner of the workpiece, jog the probe to ~3/4" away from the front-and left edges of the plate (if it's still there, inside the magic marker corner mark), plug in the plate and clip the ground lead to the probe before clicking the top autoprobe option (the plate is too small for angle compensation). When using the probe rod, replace it with the desired tool and manually probe Z to zero it.
While touch probing Z is the easiest way to zero it, eyeballing the X and Y tool position (e.g. to the front-left corner of the material) and right clicking on the X and Y coordinates will zero them.
[ comment | link | top ]
 Hitting the emergency stop will stop the steppers and the relay connected router and shop vacuum. To get the machine to its paused state, the emergency stop switch needs to be released and F11 (keyboard) needs to be pressed. In its paused state the machine can be jogged, the bit can be changed, the axes can be zeroed, the dust shoe adjusted, etc. Click the run/play icon and the machine will resume from where it was when the emergency stop was hit.
Note: To set the resume point to an earlier line in the G-code, scroll up to the desired line and click it. Using a 'GoTo foo' search (word or line #) command is another option. Resuming after going back to the path editor and making changes is yet another option.
[ comment | link | top ]
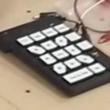 The bluetooth numpad (bNP) is setup for Shapeoko jogging. Using it requires the USB dongle labeled NumPad, that the keyboard Num Lock is off (bNP top left key or keyboard Num Lock key) and that Estlcam keyboard control is turned on (bNP bottom right ON key or keyboard Delete key). The bottom right keyboard icon on the controller interface can also be used, it will change color when keyboard control is turned on or off.
Pressing an arrow key will slowly jog the router in the desired direction. Also pressing a percent key (arrow + % or % + arrow) will increase the speed. For very small movements hold the Step by Step key down and press an arrow key, each press will move the router one step. Clicking on an axis coordinate and using the mouse wheel for stepping is another option.
Note: Some operations will turn keyboard control off. If the numpad is unresponsive press the bNP ON (only) key to turn it back on.
[ comment | link | top ]
Shapeoko
The Makerspace Shapeoko CNC Router is using Estlcam for CAM and motion control. Following are some basic informational and how-to topics about using the Shapeoko and the Estlcam motion control program. The Estlcam subcategory has information related to using the Estlcam CAM program on the Makerspace Shapeoko.
![]()
Usage Basics
Using the Shapeoko is significantly different than using the X-Carve.
[ comment | link | top ]
- Mount you material to the wasteboard
- Turn on the Shapeoko with the X-axis fully forward (insures it's perpendicular to Y)
- When your Estlcam project is ready to machine: File : Save project (as) and : Machine
- Use the numpad to move the router to the front-left corner of the material.
- Use the 3-axis probe plate to accurately set the project origin (X,Y 0 and/or Z 0)
- Position the dust shoe and tighten the knob.
- Click the run/play icon - the router and shop vac will start automatically
- The router and shop vac will stop automatically for any tool changes
- Move the router however/wherever needed for the change
- Use the (upside down) probe plate to zero Z after changing the tool
- Make sure the X/Y path to the resume point is clear of obstructions
- Click the run/play icon to resume - the router and shop vac will start automatically
[ comment | link | top ]
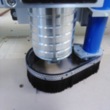
Dust Shoe
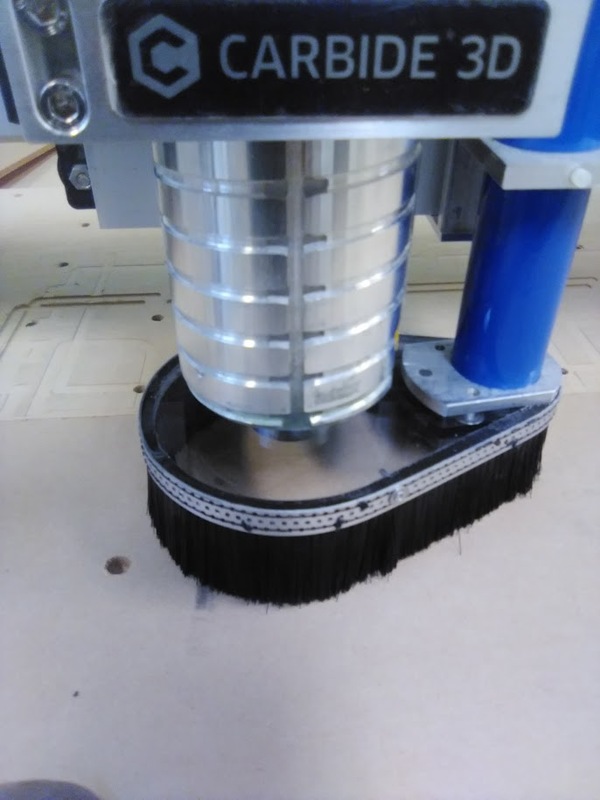 The last thing to do before machining is to drop the dust shoe down to the top of the workpiece, center it on the router collet/tool, and tighten the knob. Because the shoe is mounted to the Z carriage (instead of the router) its position is unaffected by Z moves.
 The space between the bottom of the router and the top of the shoe needs to be at least as big as the depth of cut. Deep cuts with short tools could be a problem. Letting more of the tool show is fine so long as ~3/4" of the tool is inside the collet.
[ comment | link | top ]
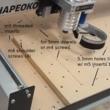
Spoilboards
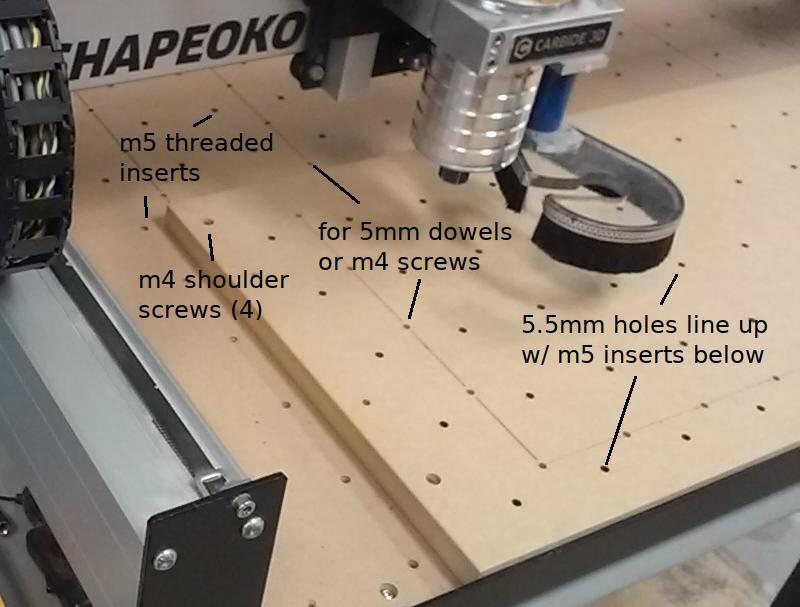 The bottom (please don't Spoil it) board has m5 threaded inserts every 64mm (X-Carve every 75). The holes along the engraved lines can accommodate 5mm dowels or m4 screws. 5mm dowels can be used to create a straightedge or square to insure that the project material will be parallel to the X and/or Y axes. The m4 inserts can be used for mounting pretty much anything, in this case they are used to mount (w/ 4 - m4 shoulder screws) the removable top (feel free to Spoil it) board. The 5.5mm holes in the top board align with the m5 inserts in the bottom board. The top board can be replaced with with any other board that protects the bottom board from through cuts.
[ comment | link | top ]
Router and Vacuum Relay
The router and shop vac are plugged into an electrical box containing a solid state relay. The relay is triggered from the spindle on/off pin on the motion controller board. Any G-code spindle on/off command (M03/M05) will turn the router and shop vac on/off. All Estlcam projects will have/send those commands at the start/end of the program and for each tool change pause/resume. The emergency stop button, Esc key, and pause icon will also turn off the router and shop vac. The rotation icon (pictured) near the bottom left of the control window can be used to test functionality.
[ comment | link | top ]
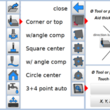
Touch Probing
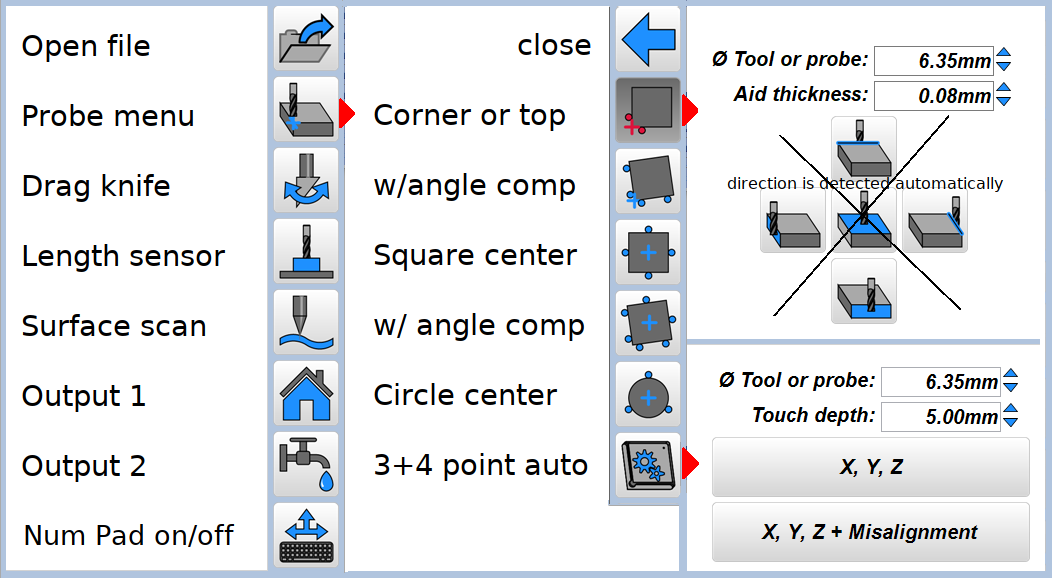 Touch probing is an easy way to set the cutting tool origin to the corner or center and/or top of the workpiece. Touch probing is basically a switch that sets an axis to zero based on when the grounded probe/tool (the double insulated Dewalt router needs a ground wire clipped to the tool) touches a piece of aluminum connected to the 5v probe port on the controller board (via the cable with a DC socket on the end). Accuracy depends on how accurate the entered dimensions for the probe/tool and aluminum are. There is a 6.35mm/1/4" drill rod probe (for straight bit X,Y 0), but spiral bits also work well as probes (depending on the bit, it may need to be rotated slightly to insure contact just behind the cutting edge).
 The only Estlcam settings that may need to be changed are probe/tool diameter (edge/corner finding only) and aid thickness. This applies to all probe options, almost all of the other settings are for probing on machines without a probe port. The aid thickness is preset when using the 3-axis touch plate (5mm X and Y, 6mm Z), enter 6mm when using it (upside down) for manual Z probing. The .08mm (aid thickness) aluminum tape can be used for all manual probing.
Manual probing: Slowly jog (arrow keys only) the axis you want to zero until the probe touches the tape or plate and stops. Release the key and the tool/probe will back off 5mm. Be careful not to ground the red/5v alligator clip (or 3-axis touch plate) and remember to attach/remove the ground clip to/from the tool. After probing you can enter the XY command to move the router to the X,Y origin. The 3-axis plate can be used for finding the center of rectangular material using the 4 or 6 point probe options (round center is tape only).
Automatic corner probing (12sec video): Place the 3-axis touch plate on the front left corner of the workpiece, jog the probe to ~3/4" away from the front-and left edges of the plate (if it's still there, inside the magic marker corner mark), plug in the plate and clip the ground lead to the probe before clicking the top autoprobe option (the plate is too small for angle compensation). When using the probe rod, replace it with the desired tool and manually probe Z to zero it.
While touch probing Z is the easiest way to zero it, eyeballing the X and Y tool position (e.g. to the front-left corner of the material) and right clicking on the X and Y coordinates will zero them.
[ comment | link | top ]
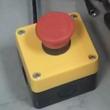
Emergency Stop
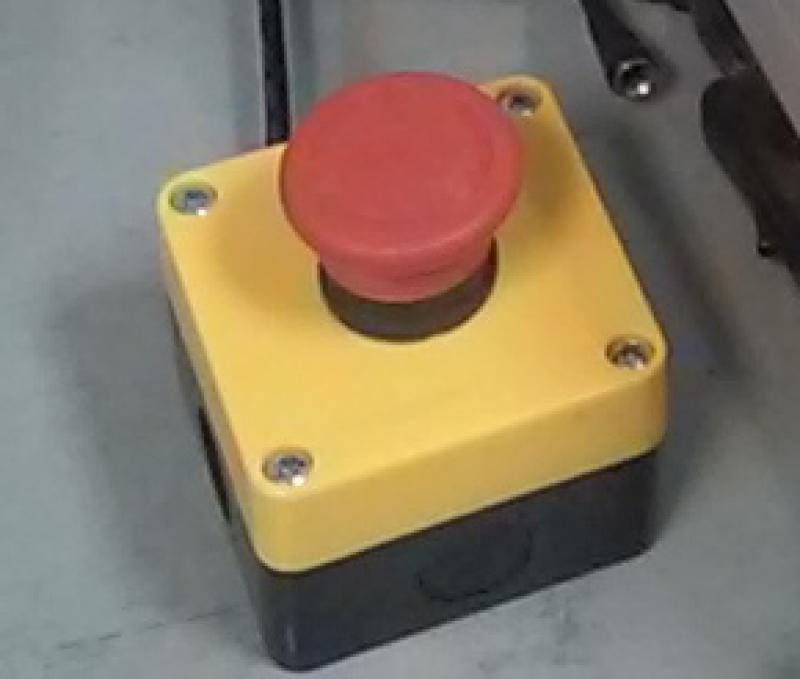 Hitting the emergency stop will stop the steppers and the relay connected router and shop vacuum. To get the machine to its paused state, the emergency stop switch needs to be released and F11 (keyboard) needs to be pressed. In its paused state the machine can be jogged, the bit can be changed, the axes can be zeroed, the dust shoe adjusted, etc. Click the run/play icon and the machine will resume from where it was when the emergency stop was hit.
Note: To set the resume point to an earlier line in the G-code, scroll up to the desired line and click it. Using a 'GoTo foo' search (word or line #) command is another option. Resuming after going back to the path editor and making changes is yet another option.
[ comment | link | top ]
Bluetooth Numpad Jogging
The bluetooth numpad (bNP) is setup for Shapeoko jogging. Using it requires the USB dongle labeled NumPad, that the keyboard Num Lock is off (bNP top left key or keyboard Num Lock key) and that Estlcam keyboard control is turned on (bNP bottom right ON key or keyboard Delete key). The bottom right keyboard icon on the controller interface can also be used, it will change color when keyboard control is turned on or off.Pressing an arrow key will slowly jog the router in the desired direction. Also pressing a percent key (arrow + % or % + arrow) will increase the speed. For very small movements hold the Step by Step key down and press an arrow key, each press will move the router one step. Clicking on an axis coordinate and using the mouse wheel for stepping is another option.
Note: Some operations will turn keyboard control off. If the numpad is unresponsive press the bNP ON (only) key to turn it back on.
[ comment | link | top ]